Saturday, December 13, 2008

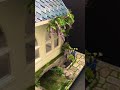
Brick & Stone Tutorials

There is a scintillating conversation going on at the Small Stuff Digest about egg carton bricks and stones. From there, I found some really good tutorial links that show you how to make cardboard/styrofoam bricks and stones. Before I forget the links, here they are:

http://www.miniland.ca/EggClass1
http://www.thechinadoll.com/bricktutorial.htm
http://www.miniland.ca/BRICK2.html
http://www.miniland.ca/GardenSteps.html

The following link by Pat Thomas explains an excellent way to make polymer clay bricks.

http://www.thomasopenhouse.com/tips_fimo.html

And this link has some really awesome dollhouse tutorials:
http://www.sylvan.com/~isabella/mini/index.html

Paperclay brick tutorial:
http://www.greenleafdollhouses.com/forum/blog/orchid_dollhouse/index.php?cat=69&st=0

Saturday, December 6, 2008

Things to look out for - Tips from Becky Winsor

After my desperate plea for help on the Small Stuff Digest, Becky Winsor came to the rescue. I found her email quite helpful, so I asked her permission to reprint it on the blog:


Hello Sumaiya,
Your question about short circuits hit home with me as I think I've made every mistake possible with wiring. I only use the tape wire and the most common error is not making sure to connect the pink side to the pink side and blue side to blue side when putting in the little brads at tape intersections. You really have to be sure the brads are going through ONLY pink or ONLY blue tape. The second most common mistake, at least by me, is allowing the little light fixture wires to touch once they're connected to the tape. That will definitely short circuit the system. Fortunately, neither of these problems will ruin a system. Once the problem is corrected the system should work just fine.
Best of luck with it,
Becky Winsor


As I was reading the email, I was mentally checking off the possibilities. Since I have a single strip of tape wire, I will not need to worry about connecting blue to blue and pink to pink. But I will definitely double check the fixture wires again to make sure their positive and negative ends aren't touching. Thank you Becky for your tips!

Thursday, December 4, 2008

How to Electrify a Dollhouse


"Oh what a tangled web we weave ..."
I get slightly philosophical when I look at the exterior of the Garfield, crisscrossed with electrical wires. Looks a fright now, doesn't it?

The photo above shows the house from the right hand side. Below are photos taken from the front, the left and the back, respectively.

A single strip of copper tape wire goes around the house. The wires from the interior lights are brought out to the exterior through tiny holes on the walls. These wires are soldered onto the main copper wire, and the junctions are secured with electrical tape.


Front View


Left View


Back View


If you look at the photo below, you can see close-ups of the connections. Instead of using a junction splice, I decided to solder the transformer's lead-in wire directly to the copper tape wire. In my experience, sometimes the junction splice's pins jiggle and lose connection with the tape wire.

So these are the steps. I am eternally paranoid about short circuits. But today, while I was blogging about the electrical work, I came across the most wonderful tutorial on Christine's Blog - Small World Builders. Upon reading the steps of the tutorial, it seems like I did things right, so I am slightly at ease at the moment. Here is the link: http://www.greenleafdollhouses.com/forum/blog/christine/index.php?&cat=163

I will cover the wirings with card-stock paper before I put bricks on the exterior. I am a bit anxious though, because once the brickwork goes up, I don't think I will have the patience to take it all down in case of a short circuit. If you find any potential red flags after reading my blog, please leave a comment, or send me a note at smehreen@gmail.com, so that I may fix the problem before I cover it all up.


Wednesday, December 3, 2008

Stairs Makeover


I had a problem with the stairs. On the second and third floor, the back rooms are at a slightly lower level from the front rooms. Shown above are the assembled stairs for the second and third floor.

I absolutely detested the original stairs: the first tread is immediately below the doorway. It seemed to me that whoever opened the door would trip and fall unless the stairs were extended a little bit from the doorway. So I bashed the two stairs together to come up with modified stairs for the second floor. Now the lady of the manor can open the door, glide in and gently walk down the stairs. In my opinion, things would be a lot easier if the rooms were at the same level. Any way ...


I didn't much care for the patchwork look on the sides of the stairs. So I covered the sides with card-stock paper and finished off with the same narrow wooden trims I am using in the rest of the house. The stairs were painted dark brown, the treads covered with the same wood-grained Con-Tact paper as the floor, a tiny golden craft-book decal for details, and the entire thing got one coat of glaze.


So, what would happen to the third floor, you may wonder. I am using the wider stairs that were meant for the porch, and promoting them to the third floor. The third floor has an open floor plan, so it doesn't bother me that the stairs start a little lower ... no surprised tumble down the stairs at any rate!

The photo below shows the second and third floor stairs, and part of the trims I am working on currently. More about trims coming up later ...